Fine Art Print – Part 2
In the first instalment we looked at what was meant by the term ‘Fine Art Print’, now I’d like to examine the print making process itself. How do we make a fine art print and how do we make sure it’s of high quality?
For the purposes of this article I am going to assume you are using either a good inkjet printer like the Epson Stylus Pro range (3800, 4880 and bigger) or a printing through a lab using a contone laser printer like a Durst Lambda or Fuji Frontier. I don’t propose to go into much detail about the mechanics of operating inkjet printers, this has been covered elsewhere. I’m more concerned with how to prepare a digital file for final output to whatever printer you have chosen.
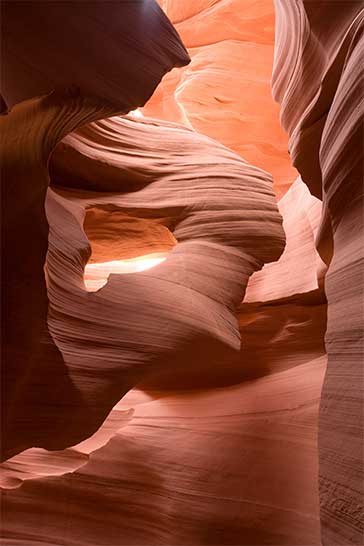
The Angel rock formation, Antelope Canon, Utah, USA
In-camera JPEG
Much like tuning a racing car where each little tweak will only improve the performance a tiny bit, in printmaking the added effect of a series of fine adjustments can add up to a print that is quite superior to one straight out of the camera. Attention must be paid to colour management, overall tonality, resolution and sharpening. By optimising each one of these you will get prints that are as good as the hardware can achieve.
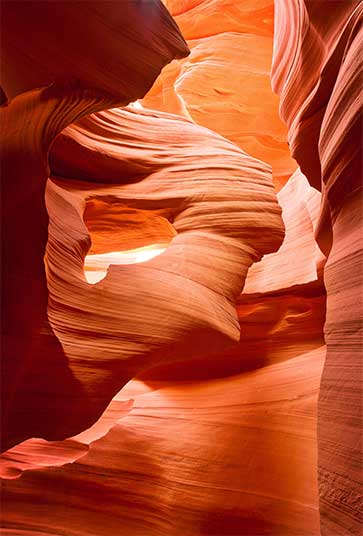
The Angel rock formation, Antelope Canon, Utah, USA
Processed in Adobe Camera RAW
Fine Art Print Colour Management
It goes without saying that you need a properly profiled monitor to be able to make decent prints in a controlled way. I recommend investing in your own screen profiling puck such as the Gretag Macbeth Eye One range or one the Monaco Spiders. A decent monitor like an Eizo is a good idea but as long as you have a reasonably new monitor and have profiled it properly then you should be fine.
You also need a good profile for the output device you propose to use. Without this you cannot accurately Soft Proof (preview) the final print on your screen and you will not be able to make maximum use the the color gamut of the device. Most labs can supply profiles these days – they should be able to email you one or have one on a download page on a website.
For desktop inkjet printers there should be a series of profiles installed with the printer driver and these are generally pretty good. Many of the better pro retailers offer a profiling service and will often have profiles for the papers they sell. When I buy a new paper type from Kayell in Brisbane they email me a profile made in house on the exact same printer that I use.
Photoshop is of course the software of choice for high end printing. The Soft Proofing feature is extremely useful in previewing how the print will look and, as a side effect, allows you to make colour adjustments that stay within the range of colours that the printer can reproduce.
Soft Proofing is quite easy to use. In PSCS3 choose View / Proof Setup / Custom. Set the ‘Device to Simulate’ to the paper and printer combination you are using, in this case “Epson 3800 Watercolour Paper Radiant White”.
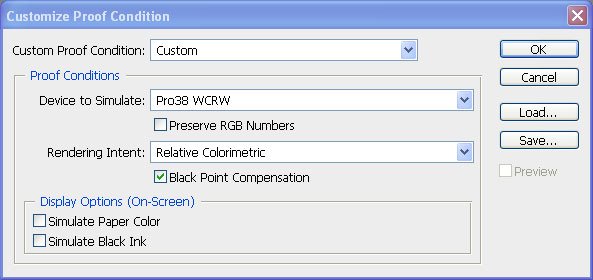
I use Relative Colormetric as the rendering intent – it’s a good starting point although Perceptual may work well too. I also always check the Black Point Compensation box to make sure I get as good a black as the printer can make.
The Screen Display Options often confuses people. If you use them the display then looks scarily horrible, flat and muddy. It is, however, quite accurate, since a print is a reflective surface not an illuminated source like a computer monitor. I generally don’t use this option but it is, strictly speaking, more accurate.
Once the Proof Settings are made you can save them for next time and use Ctrl Y to swap between proof and original. Try to avoid the temptation to flip between these two states repeatedly, the Proof will always look more dull than the original so leave the proof on and work with that.
Actually one of the main points of Soft Proofing is that any tone or colour changes that you make will only be displayed if the printer can reproduce those colours. If you make a huge saturation change for example, you may see very little change on the screen because the printer cannot print those colours and the Soft Proof only displays what the printer can print. This is a good way to get the maximum out of the printer, if you need a colour to be more saturated you can increase the saturation to a point where no more change is visible on the screen in Soft proof mode – this is therefore the maximum that the printer can print and there is no point in changing it further.
Fine Art Print Tonal Adjustments
This is where the subtleties of an image are brought out and enhanced. By this I mean that a good image straight out of the camera may look fine but there are almost always improvements to be made if you want a print that stands above the ordinary.
Since this is a very subjective aspect of print making I’ll just offer some powerful ways in which you can add some extra oomph to an image.
1. Andrew Rodney (The Digital Dog) has a great expression ‘Do all the heavy lifting in the RAW converter’. By this he means make all of the global colour and tone shifts in Adobe Camera RAW, or in the scanning software if you are working with film. By doing this you are using the full bit-depth of the original as well as having access to some tools that Photoshop cannot directly mimic, such as White Balance and Vibrance.
In other words get the image as close as you can to your final result in a RAW converter or scanner software; you should almost never need to use global curves or levels afterwards, only for some subtle tonal tweaks in specific areas.

El Capitan, Merced River, Yosemite valley, California,USA
In-camera JPEG
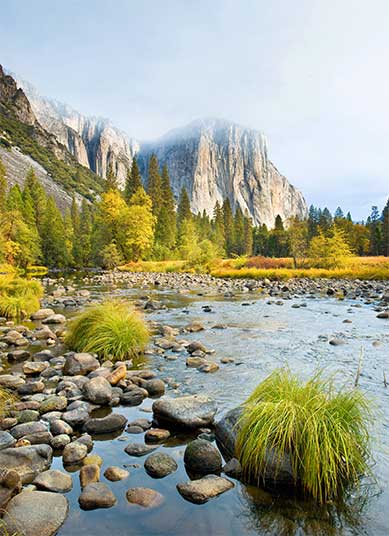
El Capitan, Merced River, Yosemite valley, California, USA
Processed in Adobe Camera RAW
Even Photoshop’s Selective Colour, my old favourite, is now built into Camera RAW and Lightroom. The HSL / Greyscale Tab has controls that offer delicate controls for hue, saturation and luminance over 8 colours, not just Red, Blue and Green.
2. The downside of Camera RAW is that it does not offer a Soft Proof option so whatever adjustments you make to your image are not necessarily printable. It is a good idea to be restrained in your initial conversion (or scan) – keep the colours ‘real’ and don’t get carried away.
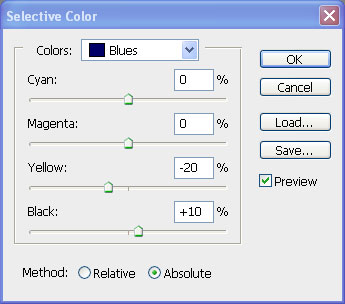
3. Once a file is opened into Photoshop you can then use Selective Colour in combination with Soft Proof to make adjustments that will show up in the final print. Colours often benefit from having their opposite colours reduced. Selective Colour (Image / Adjustments / Selective Colour) allows you to, for example, reduce the amount of Yellow in the Blues thus cleaning up a blue sky. Add a bit to Black to the Blues to make the sky darker and more contrasty. Try to keep these moves small, it’s quite easy to bring out all the noise or grain in an image by overdoing things.
Resolution
Here is another topic that gets people confused! Here are some points that may make help.
1. Image resolution and printer resolution are completely different animals. The number of image pixels per inch on a print will always be much less that the number of dots per inch that the printer lays down. This is because the printer uses many tiny overlapping dots of different coloured inks to reproduce the actual RGB value of an image pixel.
2. Too much image resolution can be a bad thing. As a rule of thumb 240ppi or 360ppi are considered ‘sweet spots’ for an inkjet printer drivers to work with. More than this is wasted. For contone printers like Frontier or Lambda use the native resolution of the device: 200 or 400 for a Lambda and 300 for a Frontier.
3. Image size numbers and resolution numbers are meaningless on their own. A 300dpi file means nothing unless you know the final reproduction size. The only meaningful information is a given dpi at a given size.
4. The difference between 1440dpi and 2880dpi on a good inkjet printer is almost imperceptible. 2880 just takes longer and uses slightly more ink.
Sharpening
Whole books have been written on this particular subject so I cannot get into the finer points here, but there are some good rules of thumb when it comes to sharpening an image for final printing.
Sharpening is very ouput-specific. By this I mean that an image needs to be sharpened in different ways for different output devices. It’s all to do with the optical illusion that is sharpening – the creation of tiny halos around edges to give the illusion of more accutance.
This means that a file cannot be sharpened for all output devices, or even all sizes. For this reason the late Bruce Fraser pioneered the use of multi pass sharpening whereby you apply light Capture Sharpening at the RAW conversion or scanning stage followed by localised Effect Sharpening and finally Output Sharpening determined by the chosen output device.
Following this methodology can result in amzingly crisp images, in fact poorly sharpened images from the same camera and lens can look almost out of focus compared to properly sharpened ones.
Capture Sharpen
In Adobe Camera RAW (and Lightroom) a setting of 25 Amount and 0.6. – 0.9 Radius will add a little crispness and remove the effects of the anti-alias filter in most dSLRs. For scanning film, high amount and low radius is a good start. If you are sharpening a digital image in PSCS3 after converting from RAW, a high (150+) amount of Unsharp Mask and low (0.6) radius can work well too.
Effect Sharpening
This is where you may choose to sharpen particular areas of an image by using masks. A typical portrait may have the eyes sharpened more the the rest of the face. One of the easiest ways to do this is to sharpen the image using Unsharp Mask, then step back one stage in Histroy and paint in the effects of the sharpening with the History Brush.
Output Sharpening.
This step is very dependant on the chosen output device and experimentation will be needed to get the results you like. I prefer using Smart Sharpen because it allows me (in Advanced Mode) to Fade the sharpening effect out of the Highlights and Shadows.
Inkjet : A radius of 1 – 2 and an amount of about 70 – 150 will work well. Judge the effect on screen until it looks oversharpened at 100% and good at 50%.
Offset : Radius of 2 – 4 and an amount of 50 – 100 is good for a high quality sheet press.
Lambda/Frontier : Radius of 1 – 1.5 and amount of 100 – 250.
Alternatively, if you don’t want to test and experiment, Pixel Genius’s Photokit Sharpener has settings for all output devices and works really well. Recommended.
Final Thoughts
I find it quite interesting that so many photographers around the world use Epson printers for their work – interesting not in that they use the same printers but in the fact that their prints vary so much in quality whilst using the same printers. It’s therefore not the hardware that is the limiting factor, it’s the information that the printer is fed – fine tuning image files is well worth the effort and the results can be stunning.