
Aperture 3 Cool Tools
Anyone who has been to one of my seminars or workshops will know that I use Lightroom 3 for much of my day to day work. It’s a program I am very familiar with, even ‘comfortable’ with, but I do try to keep an eye out for developments in other raw processors. LR3 and C1 Pro 6.1 are both dual-platform, and I do try to be as OS-agnostic as possible in Better Digital Camera but, having had Aperture 3 on my MacBook Pro since the day it was released I thought it was overdue for a good close inspection. This is not a review or a comparison, simply a look at some of the tools that grabbed me as being very clever and maybe not so well known.
I remember being a bit underwhelmed when I first checked out Aperture 3, it seemed like more of the same, if a bit smoother and with local adjustment brushes, but after going to a recent seminar about Photoshop I was struck by the fact that the presenter (Guy Gowan) used Aperture 3 as his main raw processing tool. Guy struck me as a ‘no nonsense’ kind of bloke, and I figured that if he was using Aperture 3 it was for a good reason, so I recently took the time to delve a bit deeper under the hood and see what was hidden away behind disclosure triangles and in obscure menu options.
I was surprised by what I found, and so here are a few of the Cool Tools that might not be so well known.
Highlight Recovery
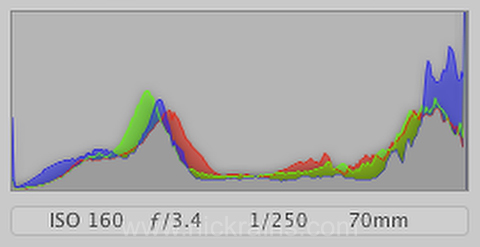
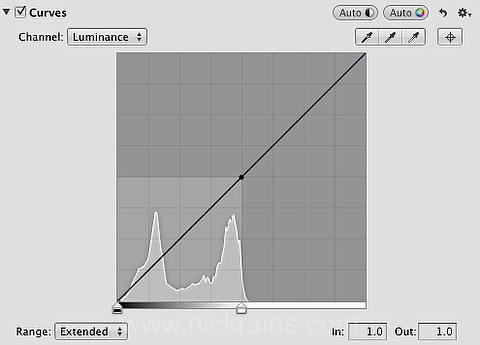
Typical clipped histogram from raw file – overexposed
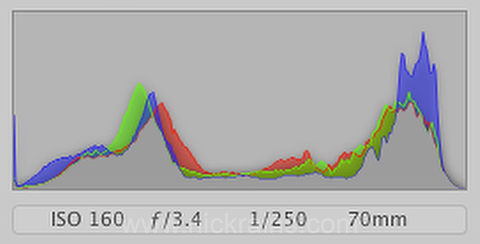
Histogram after curves adjustment – highlights recovered
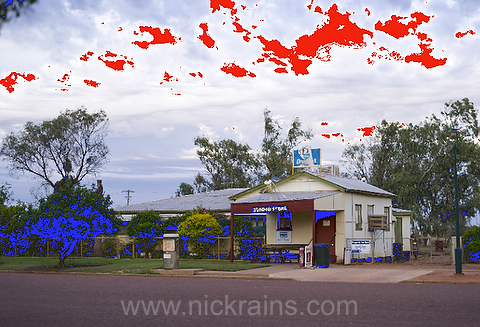
Image showing clipped highlights.
Curves display showing clipped highlights
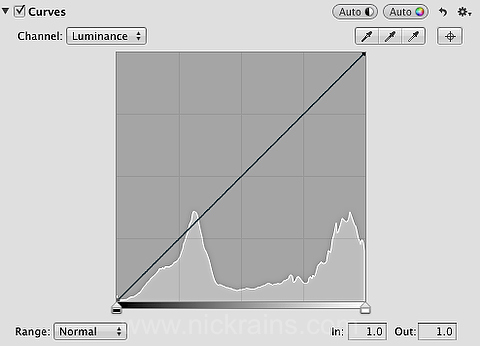
Unique to Aperture, Curves Extended View
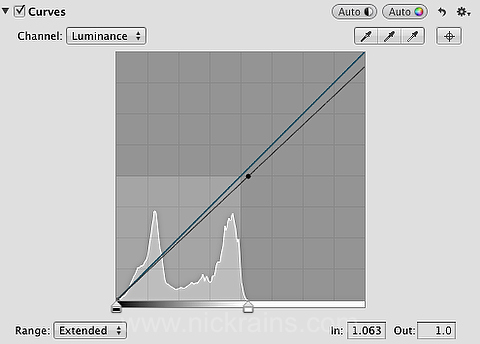
Curves Extended view with highlight point adjustment.
Yes, I know, LR3 and C1 both have some sort of highlight recovery tool but they work in a quite different way to that of Aperture 3, and, better still, Aperture 3 appears to be able to recover more highlights than the other two by about a ½ stop. Amazing but true.
The Curves tool in Aperture 3 looks like any other Curves tool until you notice the Range option at the bottom of the ‘brick’. This is set to Normal by default ( no surprise there) but it has two other settings – Extended and Shadows. We’ll look at the Shadow option in a moment but for now let’s examine what Extended does.
Click on this option and the Curves histogram shrinks down to the left revealing space to the right of the highlights. If the image is clipped by some slight overexposure Aperture 3 shows what information is still in the image data but is not being seen in the normal histogram at the top of the adjustments panel. I’m pretty sure no other raw processor shows this.
What it means is that if you have a mildly clipped image, like this one, you can set the Curves range to Extended and move the highlight slider to the right to include the extra, apparently lost, data. Only so much can be recovered of course, but from my tests Aperture 3 can pull back up to 1 stop of clipped highlights in this way.
Using the recovery slider achieves much the same result with the difference that only the brightest tones are affected, leaving the midtones and shadows alone. Using the Curves tool reduces the brightness across the whole image and the Curve may require editing to maintain contrast.
Either way, being able to see what data is in the capture but not being displayed is hugely useful and actually allows you to give some shots slightly more exposure to keep good shadow detail.
Shadow Control
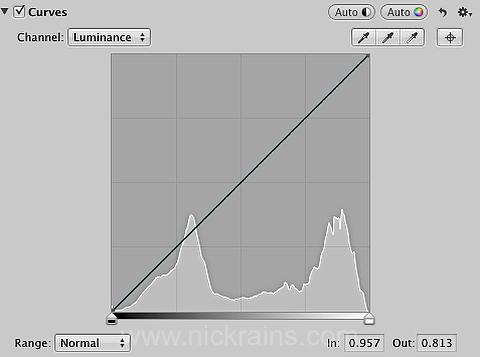
Normal Curves display

Shadow Curves display – the bottom half of the tonal range is magnified for more accurate editing.
The other Curves Range option is Shadows and this is in some ways the opposite of the Extended view as the histogram/curve is magnified x2 to only show the tones below 50% luminosity. Clicking on the small ‘target’ icon to the right of the eyedroppers allows you to click in the preview image and place handles on the curve for further adjustment. The magnified view gives you far more accurate control of shadows than in any other curves tool that I know of.
Multiple Brushes
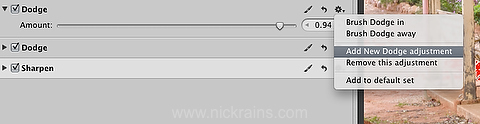
Add another identical brush adjustment ‘brick’.
Set brushes to affect different parts of the tonal range.
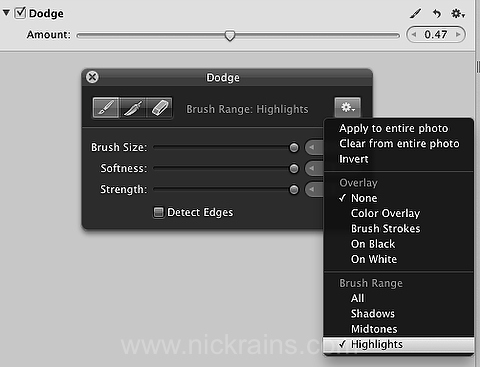
Local adjustments were introduced into Aperture 3 to bring it into line with LR3 but at the same time adding to LR3’s six control sliders. Aperture can brush in 14 different effects including Vibrancy, Noise Reduction and Skin Smoothing. Furthermore there are brushes that are the equivalent of three of Photoshop’s main blending modes Multiply, Darken and Lighten – called Polarise, Burn and Dodge respectively.
Better still, and this is something that you could normally only do in Photoshop, you can also restrict the effects of the brushes to a range – Highlights, Midtones and Shadows. This is superb for subtly dodging highlights to emphasise shape – set the Dodge brush to Highlights and paint over some image highlights. All brushes are non-destructive and editable too.
Even better, and it’s not immediately apparent, you can have multiple brushes of the same type affecting different parts of the image. If you go to Quick Brushes and choose a brush that has already been applied nothing seems to happen except the Heads Up Display (HUD) for the brush options appears. To add a new brush of the same type you need to click on the Gear icon at the top right of each adjustments brick. Here you can choose Add New Adjustment to get two or more adjustment bricks which can be used quite separately.
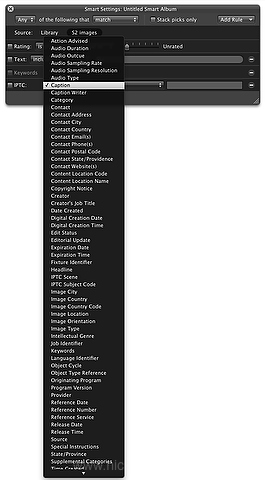
Smart Albums
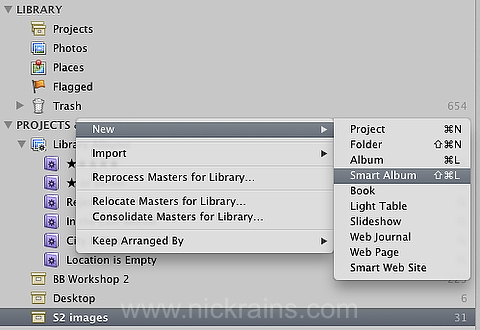
New Smart Albums
Many more metadata fields available for Smart Album search criteria.
Lightroom has the incredibly useful Smart Collection feature, something that I have written about elsewhere. Aperture 3 has Smart Albums which do much the same thing but are, in some ways, more powerful.
I love my Smart Collections in LR3 but have often been frustrated by the lack of access to some of the lesser used IPTC fields like Instructions or Usage Terms. When you create a Smart Collection in Lightroom and add a new ‘Rule’ you can choose from 28 different metadata fields plus some catalogue fields like Flagged and Star Rating etc. Aperture 3 gives you access to 62 different IPTC metadata fields in addition to all the individual EXIF fields (over 80) on top of the catalogue fields. This allows you to create very detailed Smart Albums which can be based on any metadata the image contains. One thing you can’t do is ‘nest’ search terms like you can in LR3 but the extra access to the metadata more than makes up for this.
Geotagging

30 Maps can be displayed at the bottom of the metadata tab.
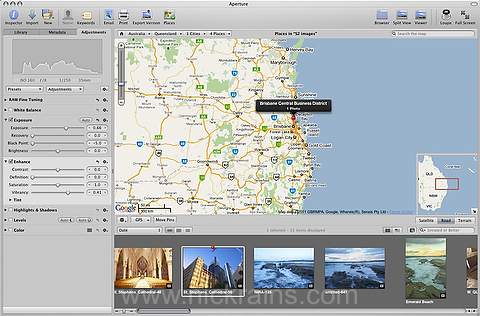
31 Maps can also be displayed in the main preview mode.

32 Dragging and dropping an image onto the map with a fine tuning dialogue box.
Another major feature of Aperture is the Places facility which is quite easy to dismiss as a bit too like iPhoto for our taste. However, if you have a need to add GPS data to image than this feature has some seriously useful tools based around Google Maps.
There are various ways to add GPD data to images, either in the metadata Inspector or in the main preview window. You can select an image, choose the metadata tab type a place name into a search field at the bottom of the panel and choose from the results. Or, in the main preview window, you can drag an image (or selection of images) onto the map and drop them where they were taken. This adds a pin to the map that other images can be dropped onto. There are so many different ways that you can simply choose the most appropriate for you.
The power of this tool lies in the fact that the GPS reference is saved with the file and any exported images will have that same information embedded in the image’s metadata just like any other information. Other applications like Bridge and Lightroom can see this information and clicking on the GPS fields often brings up a map. Not only that but the GPS reference also includes the place name from Google Maps (Reverse Geocoding) and this is added to the IPTC City, State and Country fields saving you the trouble – cool.
One thing to note: whilst there is an option to Write Metadata to Master that is supposed to write the metadata back to the original raw file, this did not seem to work. The GPS info certainly ended up in any exported TIFFs or JPEGs but it was not embedded in the raw file, in this case a DNG file. The GPS data is stored in the Aperture library only which is unfortunate as DNG is an excellent archiving format.
Soft Proofing
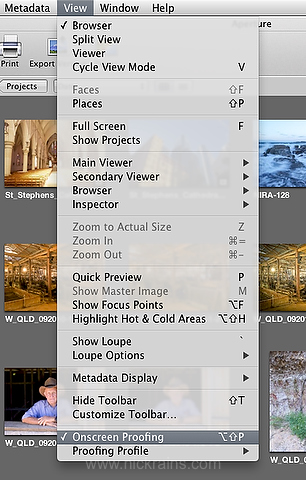
40 Onscreen Proofing option acts as a Soft Proof.
Aperture 3 also includes the facility to soft-proof an output device by choosing a profile and then turning on View > Onscreen Proofing. The monitor now shows a preview of the finished print adjusted for paper white, black point and any colour gamut limitations for the output profile. You can work with the various adjustments to optimise the image with soft-proofing turned on, in this way you cannot alter the image beyond that which the output device can reproduce.
External Editors
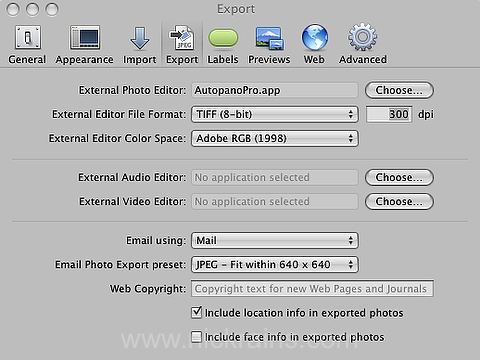
50 Specify an External Editor in preferences. Shift-Cmd-O triggers this command.
Aperture 3 allows the definition of one external editor at a time (Preferences > Export) and this need not necessarily be Photoshop. I set it to Helicon Focus to see what happened when I selected a stack of images that I had shot with different focal points. Using the Photos > Edit in Helicon Focus command I was pleased to see that the whole set was processed and opened into Helicon Focus ready to focus stack.
I also tried to do the same with Autopano Pro but the images opened in different groups rather than all in one group for stitching. I suspect this is a problem with Autopano Pro rather than Aperture 3 since the same thing happens with Lightroom (on a Mac at least – it’s fine on a PC!).
It would be nice if more than one external editor could be defined like in Lightroom (Aperture can reference one other application plus Photoshop to be accurate) but it’s not that onerous to choose a new one each time.
All in all Aperture 3 is a fine piece of software, it does all the things that you’d expect from a good raw processor. Beyond that however, there are some rather nice little touches which elevate it beyond the norm – all it takes is some investigation under the hood and you’ll be surprised what you might find.